import Definition from “/src/components/Definition.astro”;
Introduction
Section titled “Introduction”This page describes the steps for a customer to evaluate Aembit’s Workload Credential Management, which includes the following configuration steps:
- Configure Aembit Cloud
- Create an
- Configure and test
Components
Aembit Cloud Configuration Steps
Section titled “Aembit Cloud Configuration Steps”To configure your
- create a
- create a
- create a
- create a
- create an
Create a Trust Provider
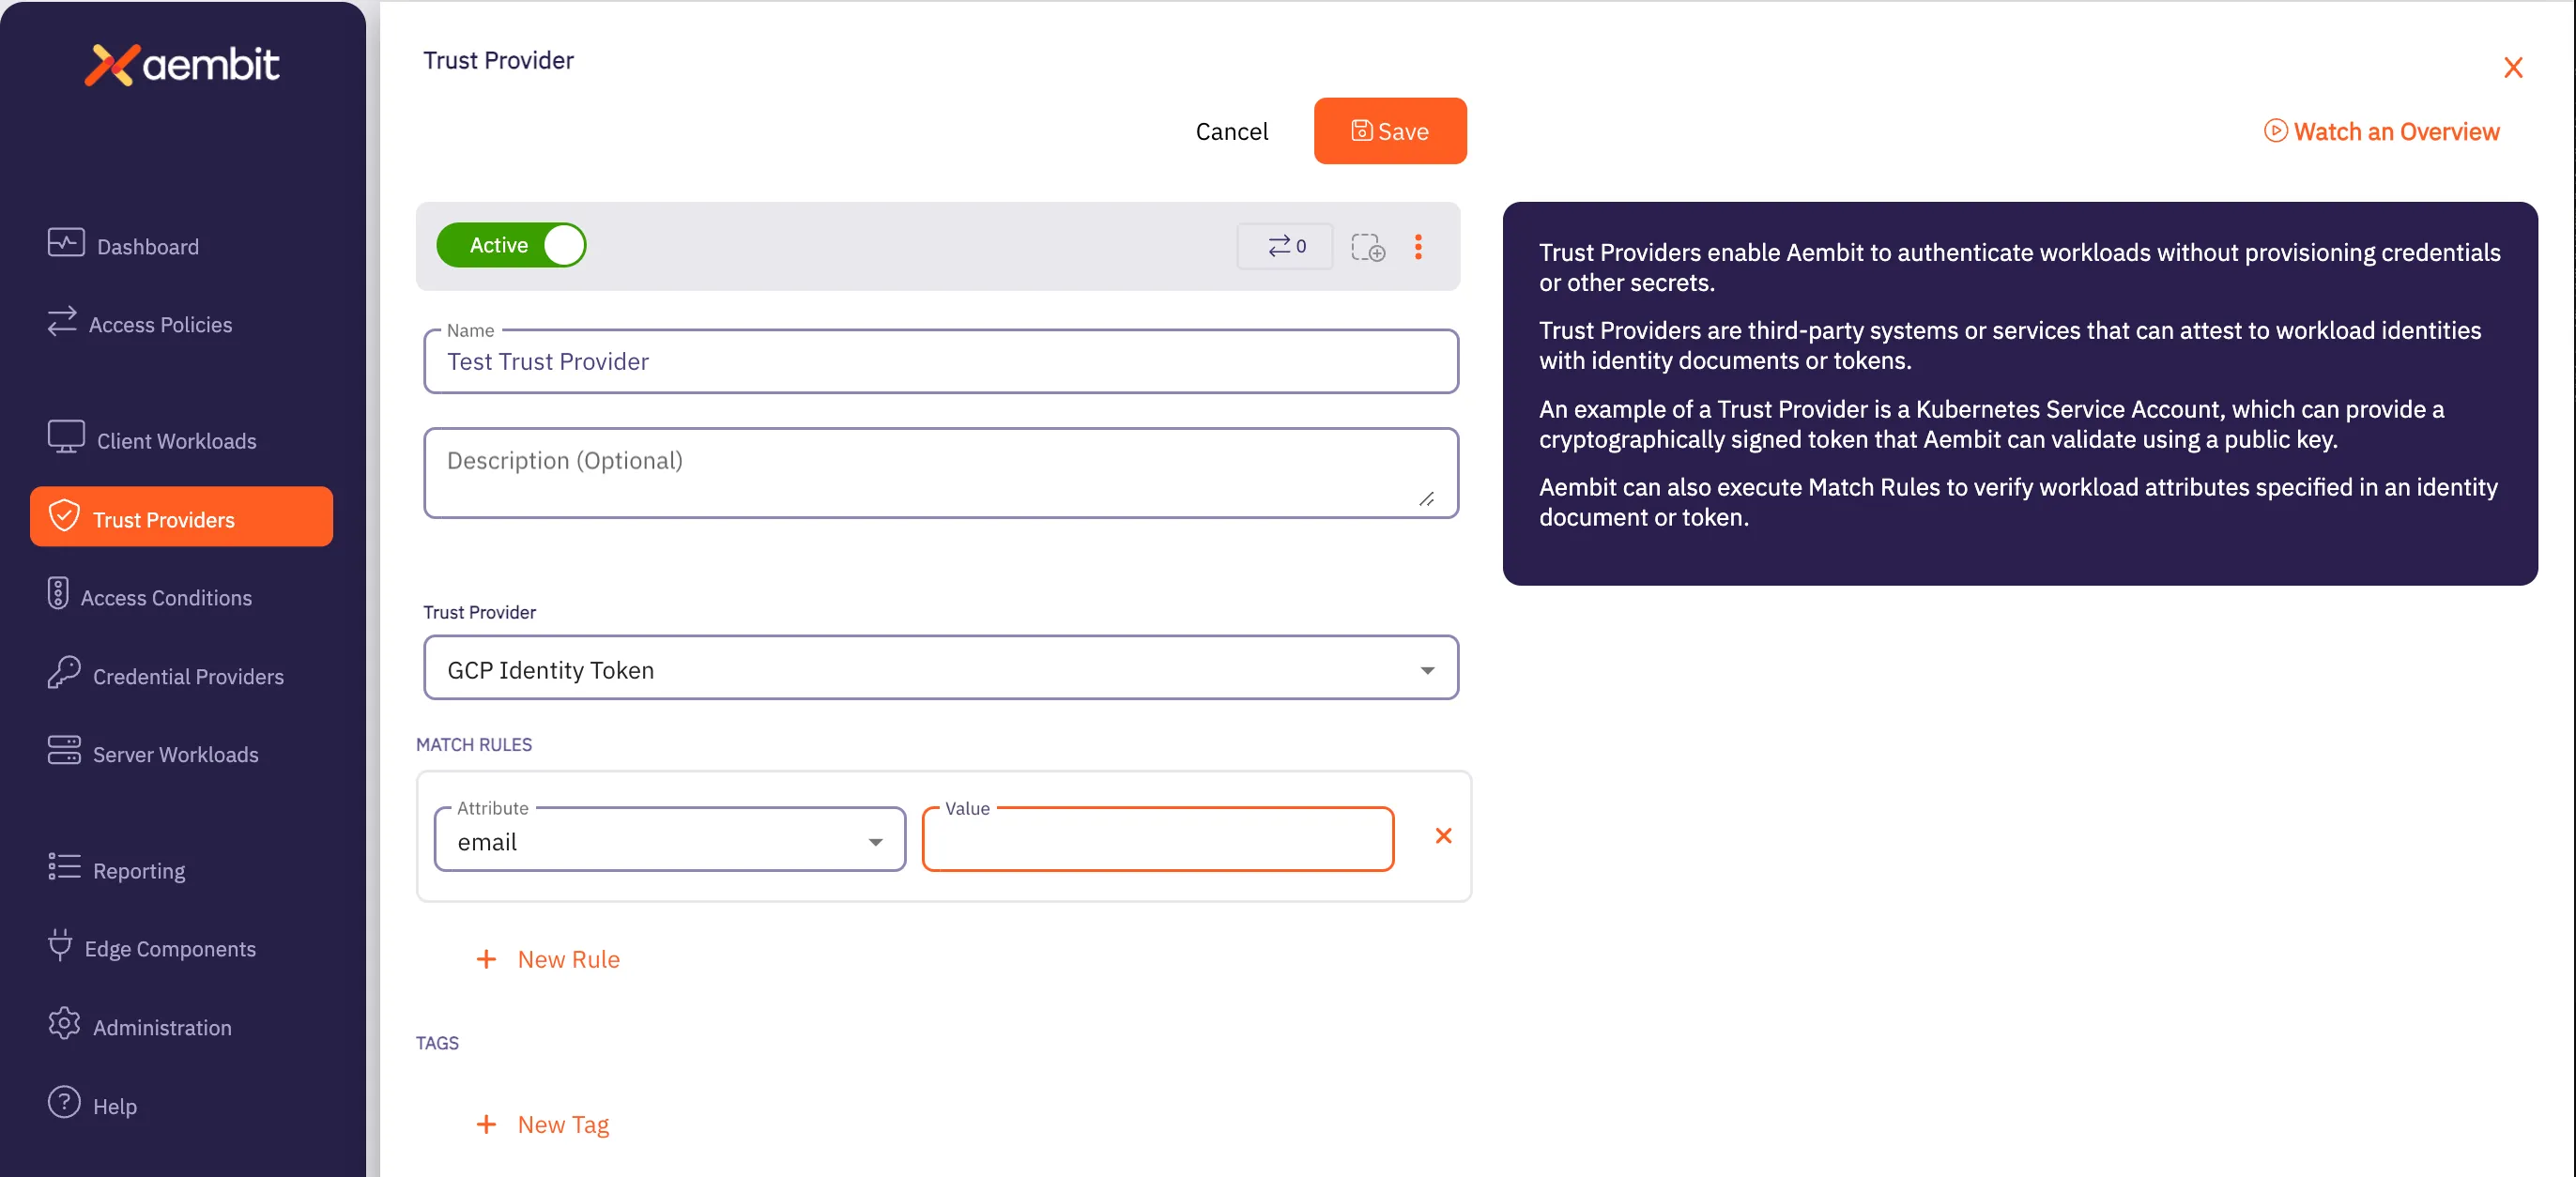
Section titled “Create a Trust Provider”To create a Trust Provider, you need to specify the type of Trust Provider. In this example, you will set the Trust Provider type to GCP Identity Token by following the steps listed below.
-
Click on the Trust Provider link in the left sidebar.
-
Click on the New button to create a new Trust Provider. You should see the Trust Provider page appear.
-
Enter information in the following fields:
- Name - Name of the Trust Provider.
- Description - Optional text description of the Trust Provider.
- Trust Provider - Select GCP Identity Token from the drop-down menu for this field.
-
In the Match Rules section, click on New Rule. Two new fields appear: Attribute and Value.
- In the Attribute dropdown menu, select email.
- In the Value field, enter the email address of the GCP Cloud Run Job Service Account.
-
Copy the
Client ID, which is available after you click Save. This value needs to be placed into the{aembit-tp-ClientId}variable below.
Create a Client Workload
Section titled “Create a Client Workload”Once you have created a Trust Provider, you need to now create a Client Workload. Perform the steps listed below.
-
Click on the Client Workloads link in the left sidebar.
-
Click on the New button to create a new Client Workload. You should see a Client Workload page appear.

-
Enter information in the following fields:
-
Name - Name of the Client Workload.
-
Description - Optional text description of the Client Workload.
-
Client Identification - Enter the following values:
- In the Client Identification drop-down menu, select GCP Identity Token.
- In the Value fields, enter the email address of the GCP Cloud Run Job Service Account.
-
Create a Server Workload
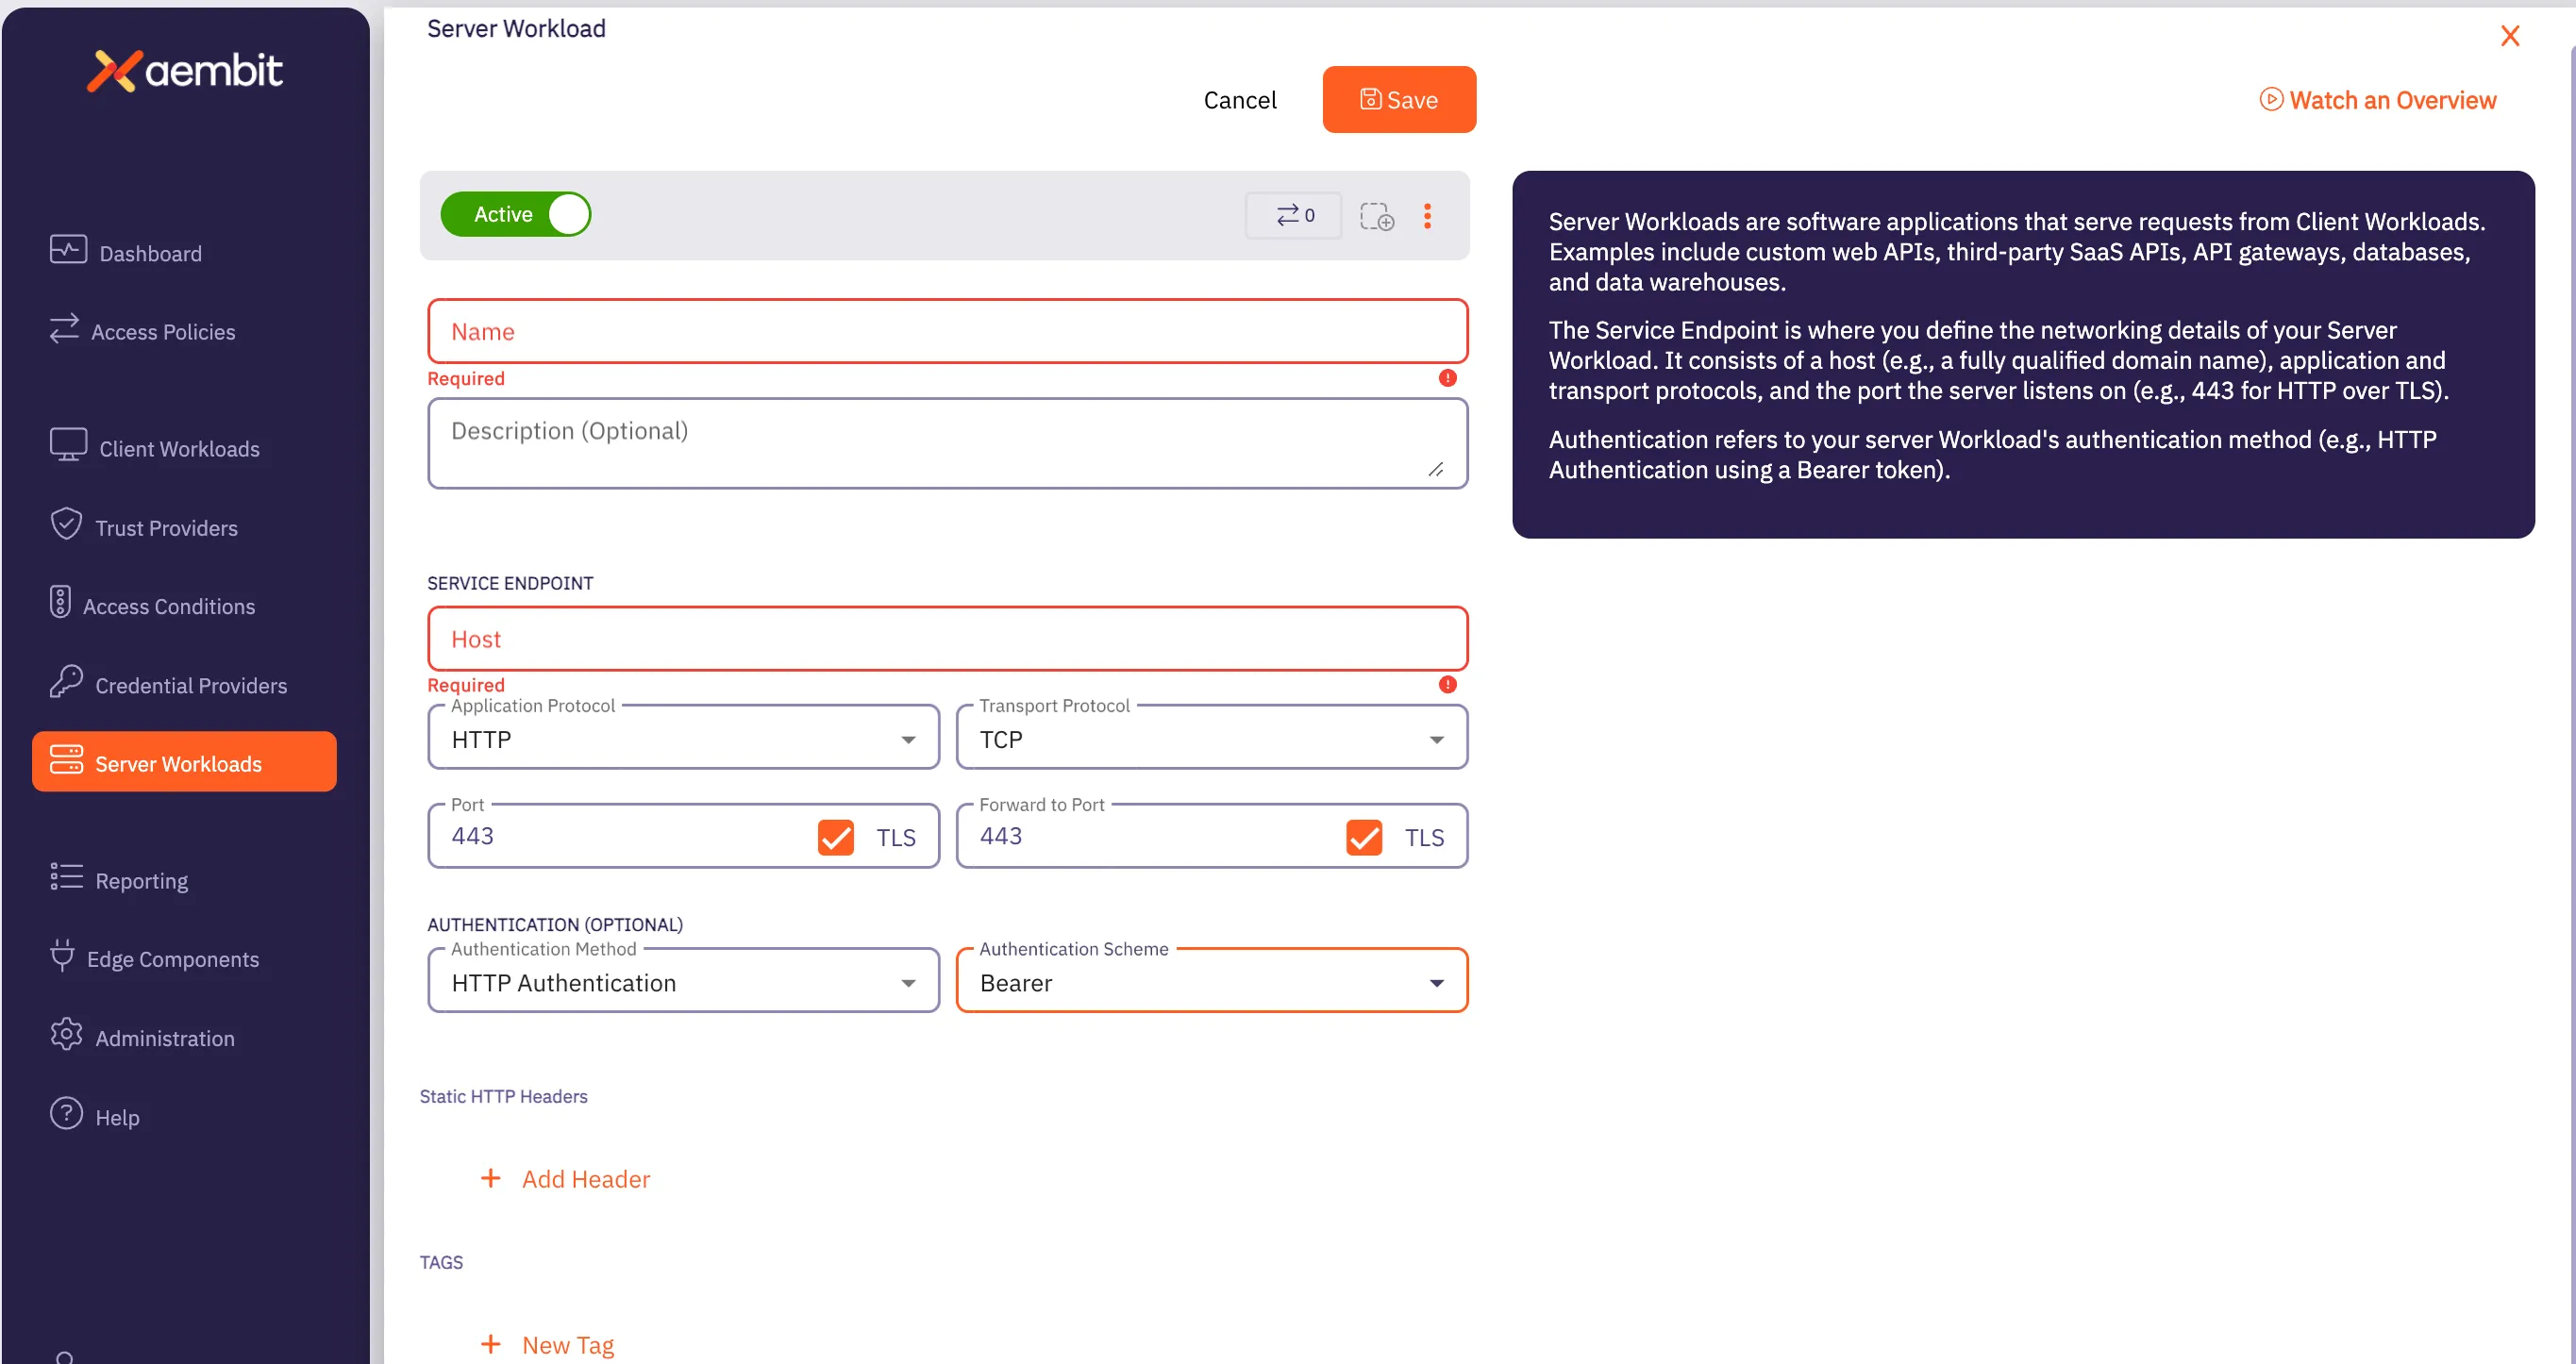
Section titled “Create a Server Workload”Next, you need to create a Server Workload. Perform the steps listed below.
-
Click on the Server Workloads link in the left sidebar.
-
Click on the New button to create a new Server Workload. You should see a Server Workload page appear.
-
Enter information in the following fields:
-
Name - Name of the Client Workload.
-
Description - Optional text description of the Client Workload.
-
Service Endpoint Information - Enter the following values:
- Set the Host value to
secretmanager.googleapis.com. - Select
HTTPfrom the Application Protocol drop-down menu. - Check the Port and Port Forward TLS checkboxes. Ensure that both ports are set to
443. - For Authentication, select
HTTP Authenticationwith theBearerAuthentication Scheme
- Set the Host value to
-
Create a Credential Provider
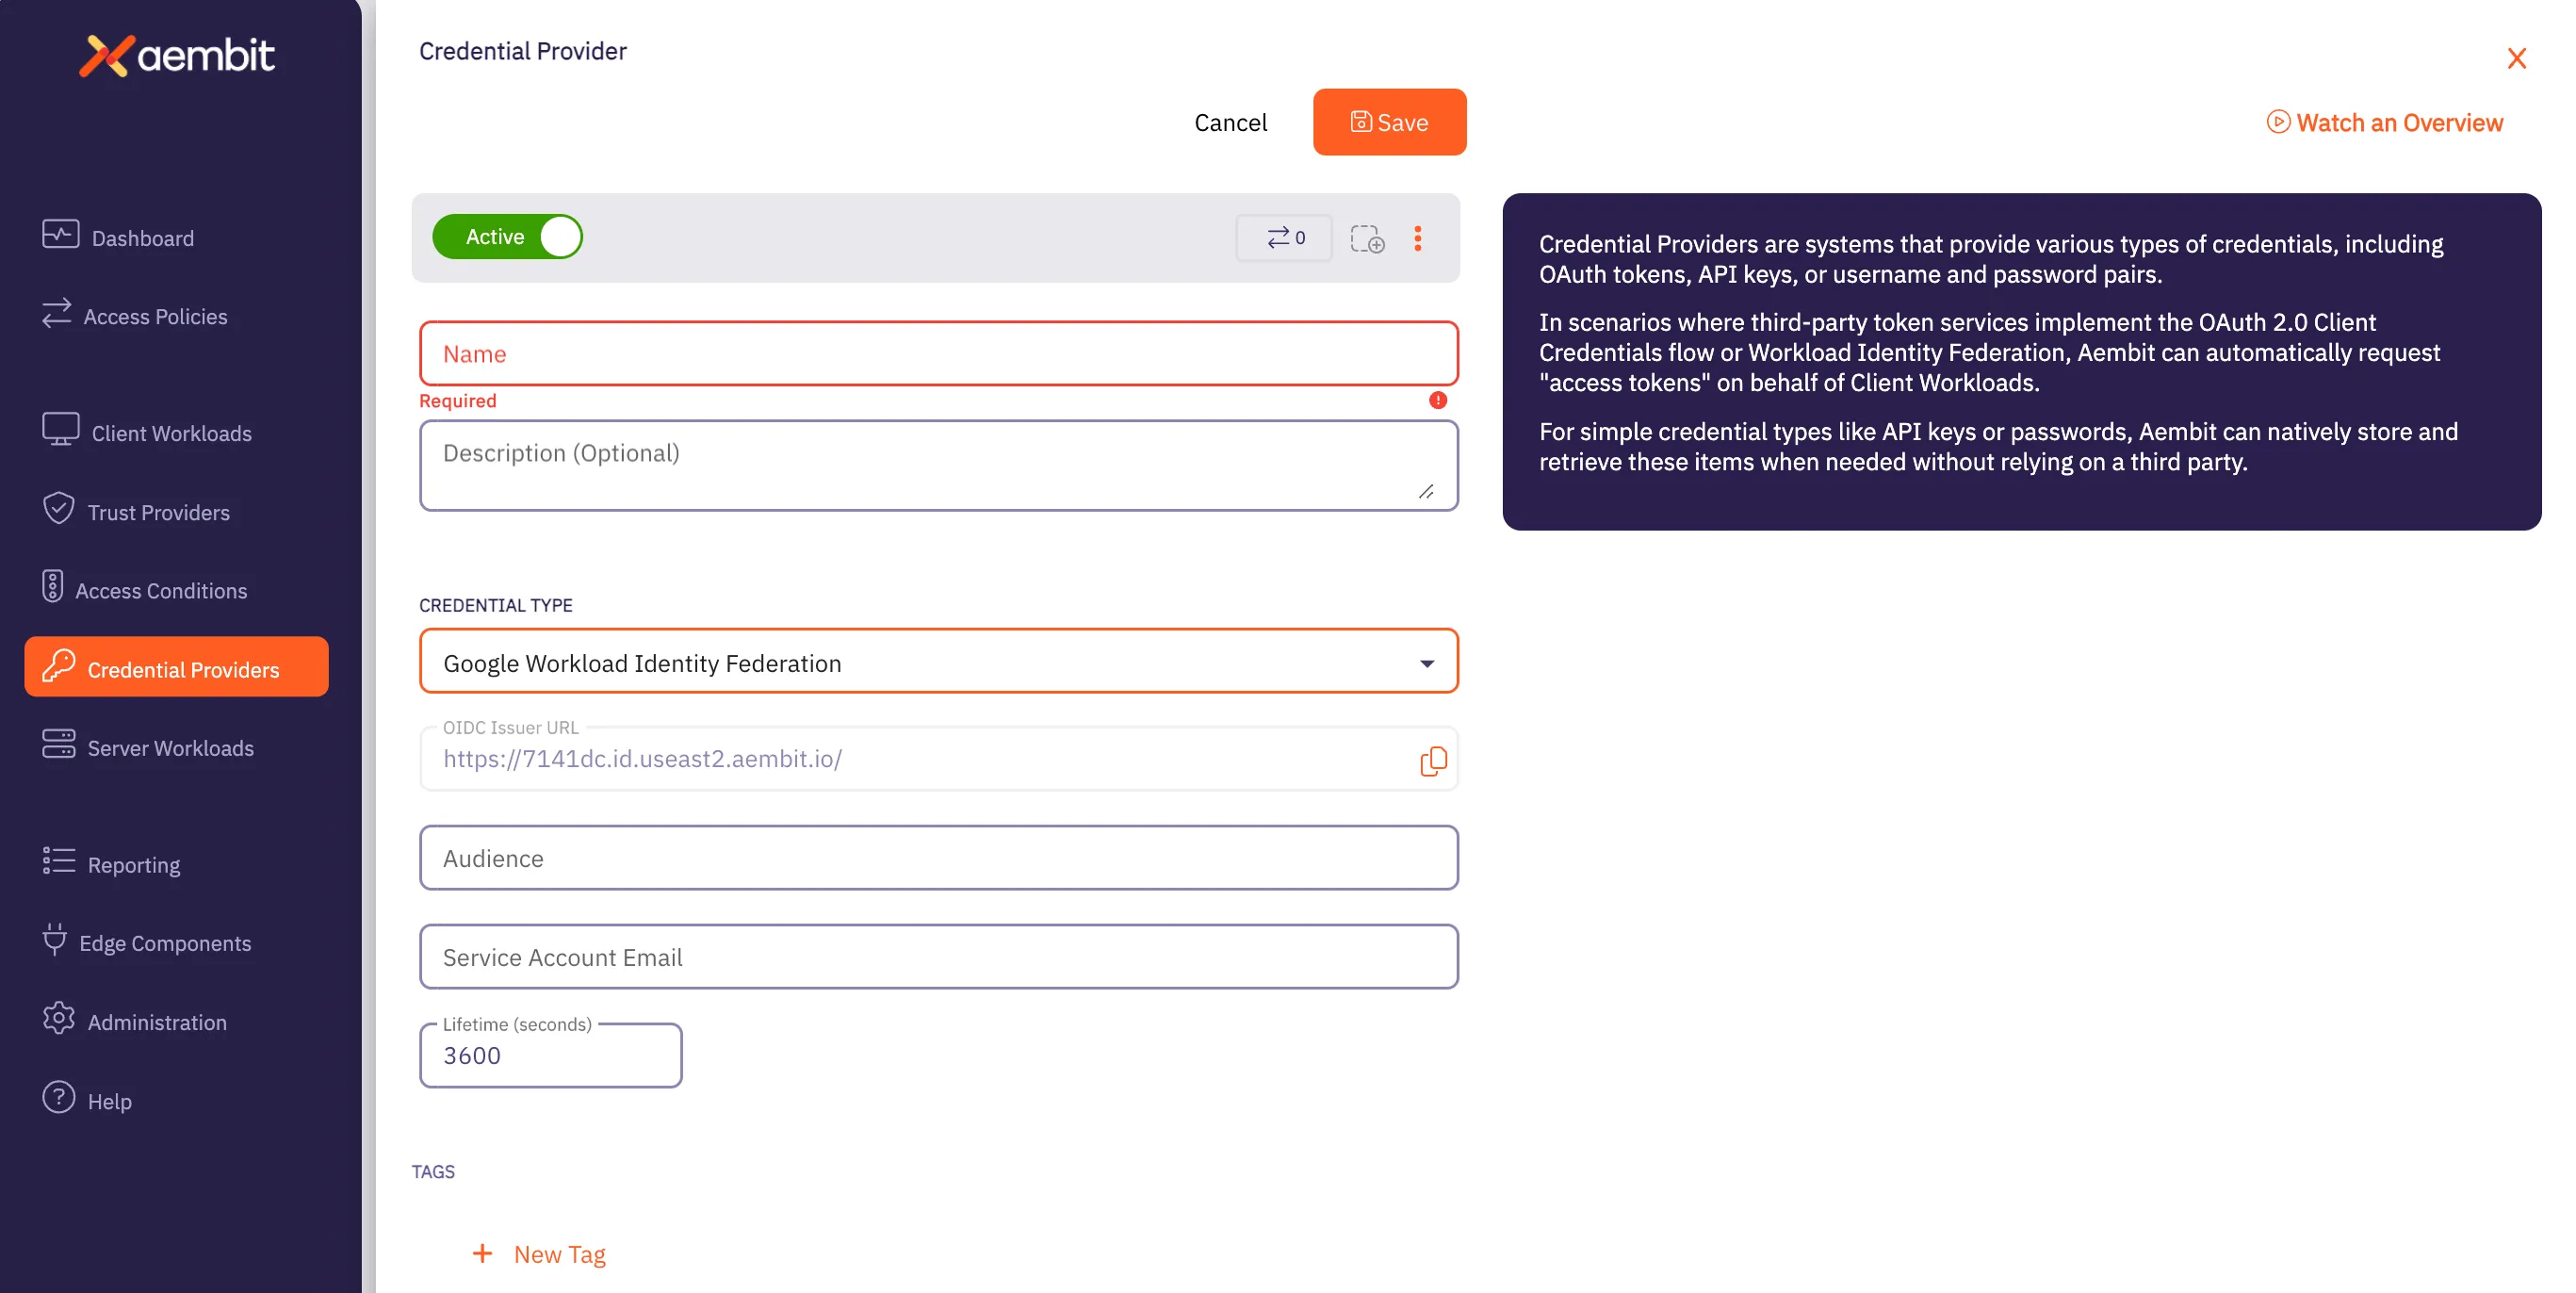
Section titled “Create a Credential Provider”After creating the Server Workload, you must now create a Credential Provider by performing the steps listed below.
-
Click on the Credential Providers link in the left sidebar.
-
Click on the New button to create a new Credential Provider. You should see a Credential Provider page appear.
-
Enter information in the following fields:
-
Name - Name of the Credential Provider.
-
Description - Optional text description of the Credential Provider.
-
Credential Type - This needs to be Google Workload Identity Federation.
- In the OIDC Issuer URL field, copy the OIDC Issuer URL and enter it into a GCP Workload Identity Federation Pool Provider (of type OpenID Connect (OIDC))
- In the Audience field, copy the default audience of the GCP Workload Identity Pool Provider into the Aembit
Credential Provider Audience field (without
https, so it should start with//iam.googleapis.com/projects) - Within the GCP Workload Identity Pool Provider, set the Attribute Mapping OIDC 1 value to
assertion.tenant - Configure your GCP Workload Identity Pool with a Connected Service Account and set the Aembit Credential Provider Service Account Email to the email address of the Connected Service Account.
Notes
- The GCP Cloud Run Job Service Account and Workload Identity Federation Pool Connected Service Account do not need to be the same Service Account.
- Use the Verify button to ensure the Credential Provider is working properly before proceeding.
-
Create an Access Policy
Section titled “Create an Access Policy”Next, you need to create an Access Policy. Because you have already created a Trust Provider, Client Workload, Server Workload, and Credential Provider, you simply need to perform the following step:
-
Create an Access Policy for all of the above Aembit elements.
- When adding the element of each type, use the Existing button and select the previously created element.
- When all elements have been added, click *Save & Activate to finalize the Access Policy.
Create an Access Condition (Optional)
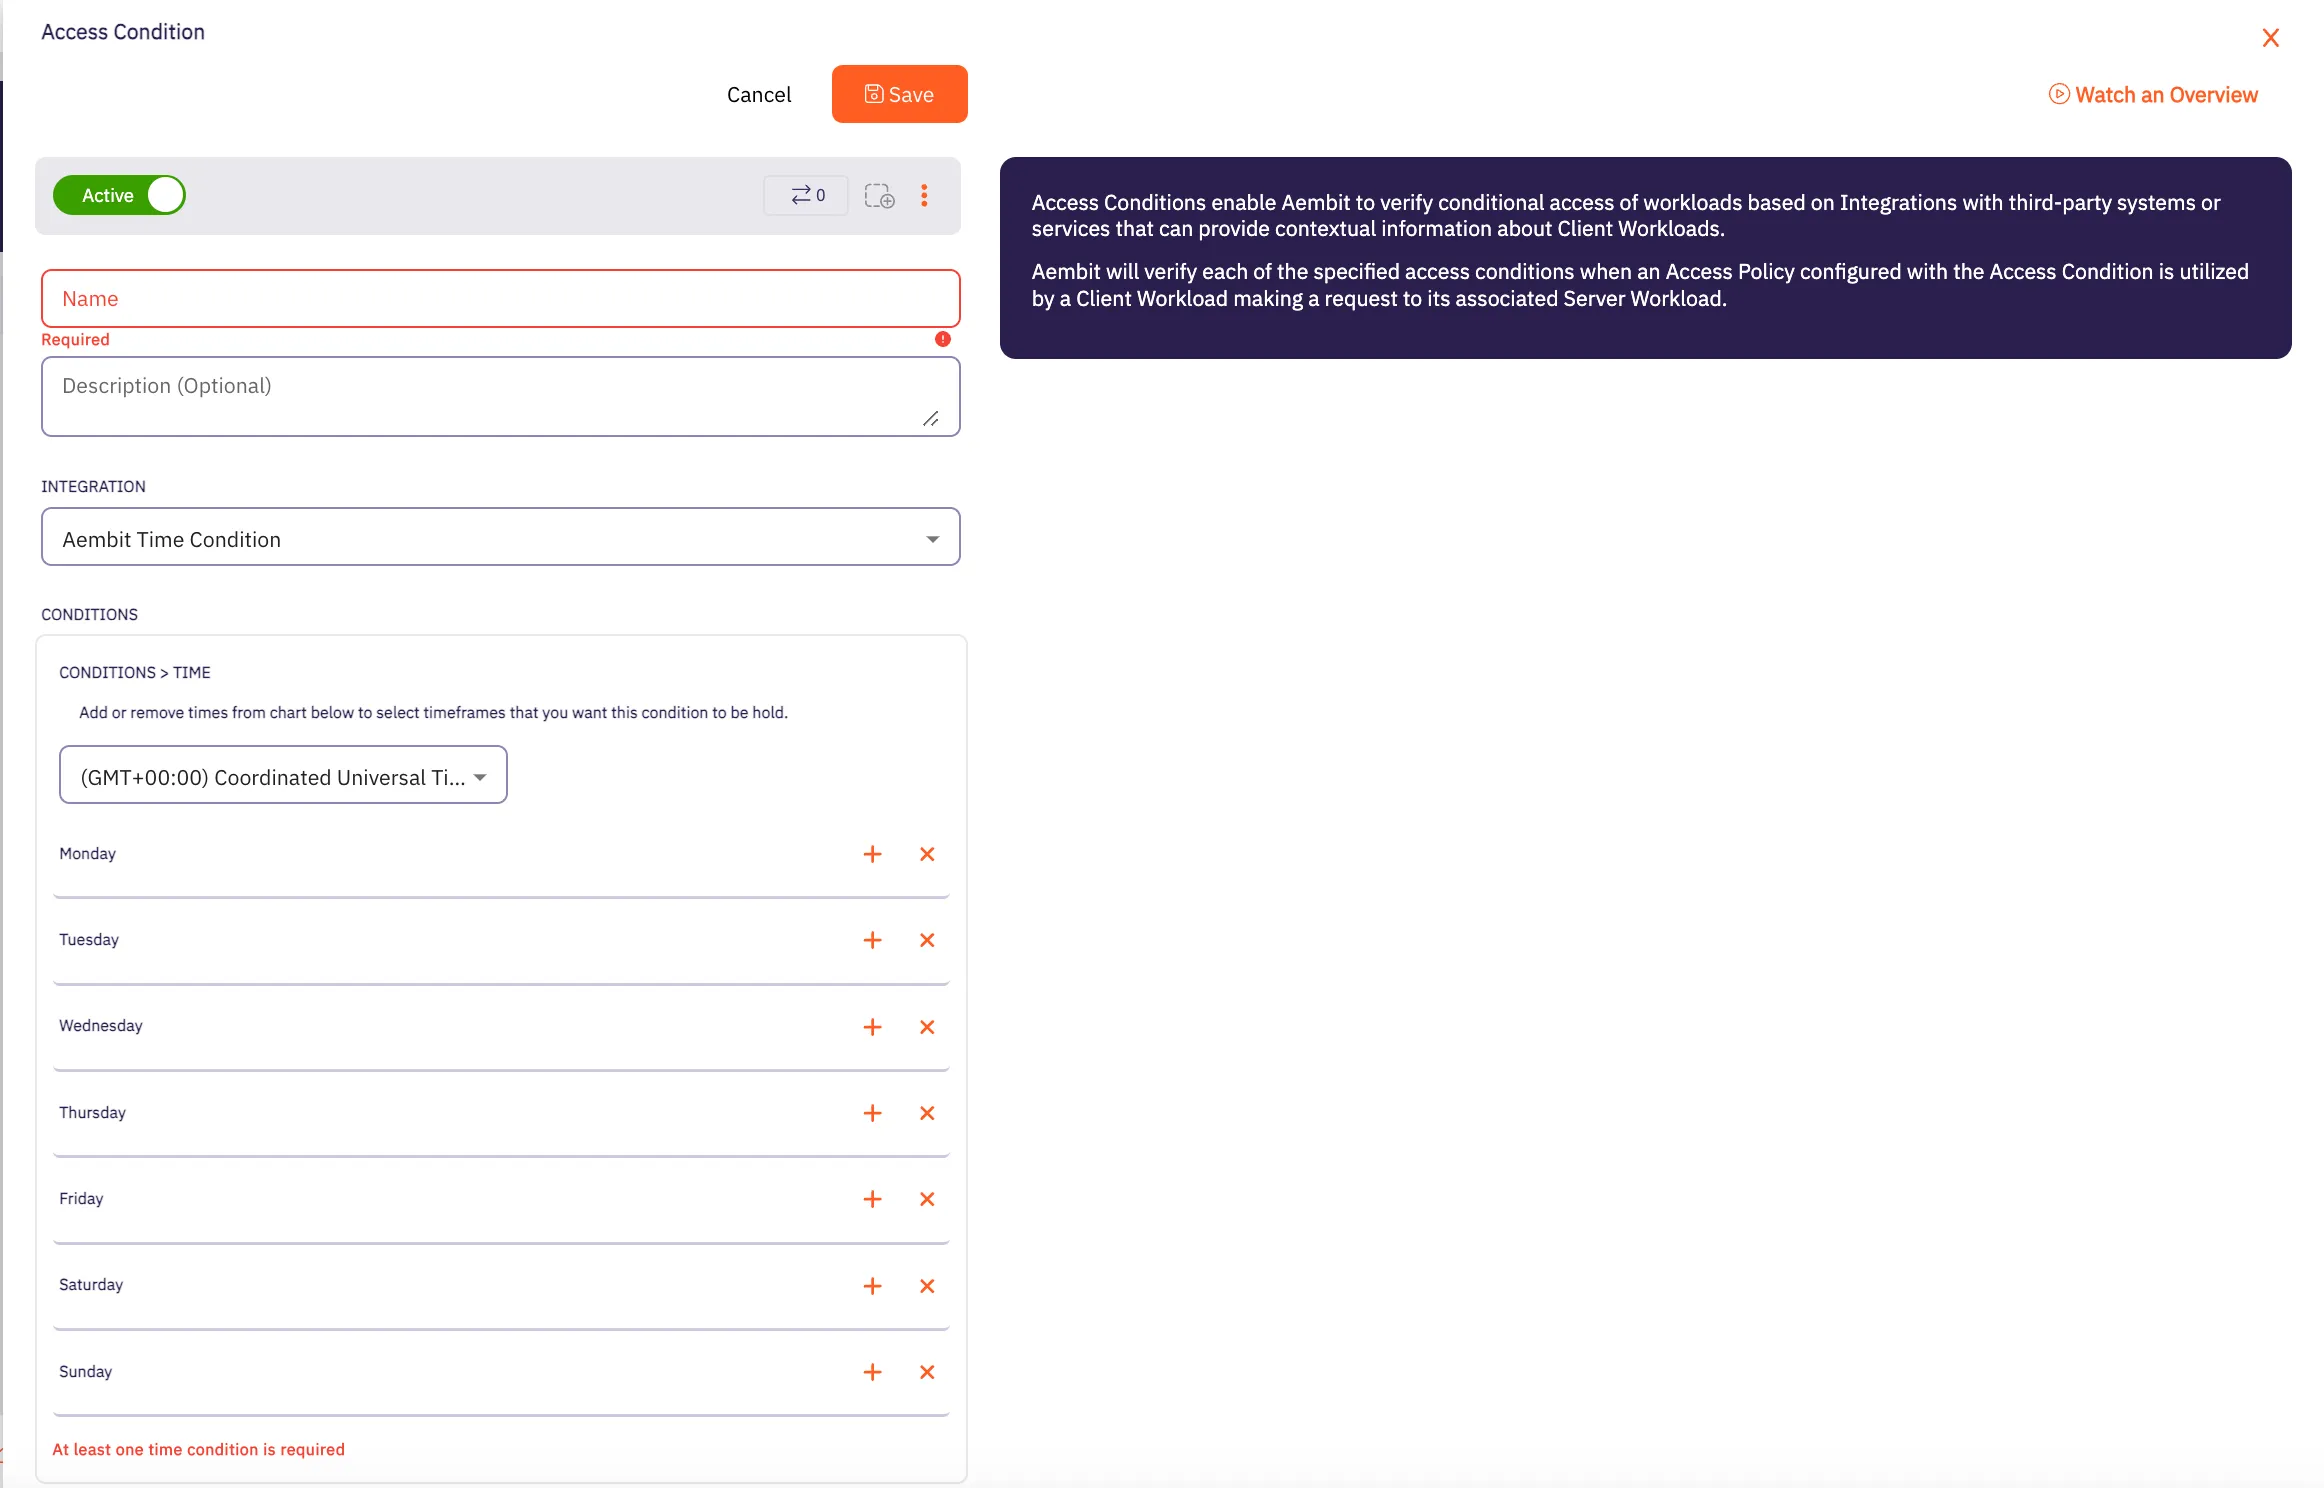
Section titled “Create an Access Condition (Optional)”The final step you may choose to perform is to create an Access Condition that restricts the time a credential may be retrieved. Perform the steps listed below. If you choose to create an Access Condition, this Access Condition is added to the Access Policy.
-
Click on the Access Conditions link in the left sidebar.
-
Click on the New Access Condition button to create a new Access Condition. You should see an Access Condition page appear.
-
Enter information in the following fields:
-
Name - Name of the Access Condition.
-
Description - Optional text description of the Access Condition.
-
Integration - The type of integration for the Access Condition. For now, select Aembit Time Condition.
-
Select the Time Zone that should be used for the Time Condition (the values and specific days and times for which access will be allowed).
-
Aembit Edge Configuration and Testing
Section titled “Aembit Edge Configuration and Testing”-
Go to the folder which has your GCP Cloud Run Job source code.
-
To build and deploy to GCP Cloud Run, execute the following command (adjusting configuration values as needed):
Terminal window gcloud run jobs deploy {job-name} \--source . \--tasks {tasks} \--max-retries {retries} \--region {region} \--set-env-vars "AEMBIT_CLIENT_ID={aembit-tp-ClientId}" -
To execute the GCP Cloud Run Job, the following command can be used, or you can go into the GCP Console and click Execute within the specific GCP Cloud Run Job.
Terminal window gcloud run jobs execute {job-name} --region {region} -
Review Authorization Events
Now that the Cloud Run Job has executed, you can go into your Aembit Tenant and the Reporting section, and select Access Authorization Events.